
Android - Hello world application

  I assume you have configured your eclipse or STS for android application development. If you not configured then follow up my previous tutorial.
   1. For creating new android project open your eclipse or STS and go to File - New then choose Others. Select Android Project option and click Next.

 
   2. Choose your android target version. It's based on your requirement, here I have choose my android version as 2.1. and click Next.


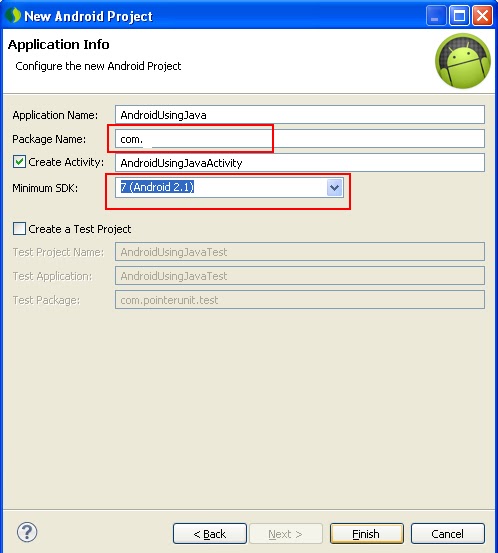
   3. Specify your Java package name, Choose your minimum SDK version as 7 and click Finish.


   4. The final folder structure will be looks like this. 


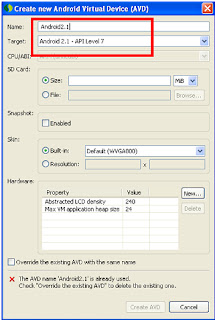
   5. For running this application you have to configure your "Android Virtual Driver Manager". This is one time process for entire application development. For configuring this one, Choose Window -- AVD Manager or Click AVD icons present in your eclipse or STS.
  

   6. Click New button, Choose your target as same you gave during project creation time and give some name. Give some 100 MB size as SD card size and click Create AVD buttons.

  7. Ok now you have successfully created a new android emulator for testing our application. For running application, Right click on project root folder, Choose "Run As" option and click "Run Configuration".

   8. Click Target option, and select your target then click "Run".

  9. Now you will get result like this.
    Now you get a confusion, I didn't write any code then how it displayed this message? 

   10.   Open your main.xml file present in layout folder and see the XML code. By default whenever you create android application the TextView component is created, this have the value as "Hello World" with application name. Just modify the android:text property value as @string/Hello World.


   11. Now run the application using emulator, you got the result like this.
  Yes, You have successfully created your first android application. For testing with real phone you have to install the .apk file present in bin folder into your android phone.


Comments

Popular posts from this blog

Getting key/value pair from JSON object and getting variable name and value from JavaScript object.

 Hi, I had faced one issue like this. I have an JSON object but I don't know any key name but I need to get the all the key and corresponding value from JSON object using client side JavaScript. Suddenly I wondered whether it's possible or not, after that I had done lot of workaround and finally got this solution. See the below example.    function getKeyValueFromJSON() {     var jsonObj =  {a:10,b:20,c:30,d:50} ;     for ( var key in jsonObj) {       alert( "Key: " + key + " value: " + jsonObj[key]);     }  }  In this example I have created the one json array as string, and converted this string into JSON object using eval() function. Using for-each loop I got all the key value from jsonObj, and finally using that key I got the corresponding value.  Finally I got the alert like this,    Key: a value:10    Key: b value:20    Key...

Meteor tutorial - Part II - Building mobile applications

In my previous blog post , I have explained basics of meteor. In this tutorial I am going to add mobile support to the existing meteor application. Installing mobile SDKs Before going to start we need to install IOS and android SDKs (Software development kit). Here I am installing SDKs for iOS. Please keep in mind this is one time process. For installing iOS SDKs, we need to invoke “meteor install-sdk ios”. The same way you can install android SKDs by invoking “meteor install-sdk android” command. Adding mobile platform support I am using already created application called “myapp” and going to add iOS platform support by invoking a command “ meteor add-platform ios ”. We can add android platform by invoking a command  “ meteor add-platform android ”. Running application on mobile emulator Once we add mobile platform then we can run our application by using real mobile device or emulator. I have added IOS platform to myapp already. Now I am going to ru...

Meteor tutorial - Part I

What is Meteor? Meteor is a complete open source platform for building web and mobile application by using JavaScript. It is a combination of NodeJs, MongoDB and client side JavaScript. Installing meteor Meteor supports windows, linux and Mac operating systems. Invoke below command in terminal for installing meteor in mac operating system. Check below link for installing meteor on other operating systems. http://docs.meteor.com/#/basic/quickstart Creating an application The command “meteor create <<app_name>>” is used for creating new meteor application. I have created an app called “myapp” and will see how we can run the application. Running an application “meteor run” command is used for running meteor application. Internally it start a node js server and by default that will listen 3000 port number. Just make sure you are in project directory (myapp) before invoking run command. ' Other useful meteor commands Meteor provides lot of usefu...